> ## Documentation Index
> Fetch the complete documentation index at: https://docs.mailgreet.com/llms.txt
> Use this file to discover all available pages before exploring further.
# Managing Subscribers
> Comprehensive guide to managing, organizing, and segmenting your email subscribers in MailGreet
# Subscriber Management Guide
## Understanding Subscribers
### Types of Subscribers
MailGreet classifies subscribers into different categories:
* **Active**: Engaged subscribers who have opened or clicked your emails recently
* **Unconfirmed**: Subscribers who haven't confirmed their subscription (for double opt-in)
* **Unsubscribed**: People who have opted out of your emails
* **Bounced**: Email addresses that have hard-bounced (permanently undeliverable)
* **Junk**: Addresses marked as spam traps or known problematic domains
### Subscriber Data Fields
Standard fields available for all subscribers:
* Email address (required)
* First name
* Last name
* Company
* Phone
* Country
* City
* Address
* Zip/Postal code
* Birthday
* Gender
* IP address
* Signup source
## Managing Your Subscriber List
### Viewing Subscribers
To view existing subscribers:-
1. Navigate to the [Subscribers](https://mailgreet.com/dashboard/subscribers) section in the sidebar.
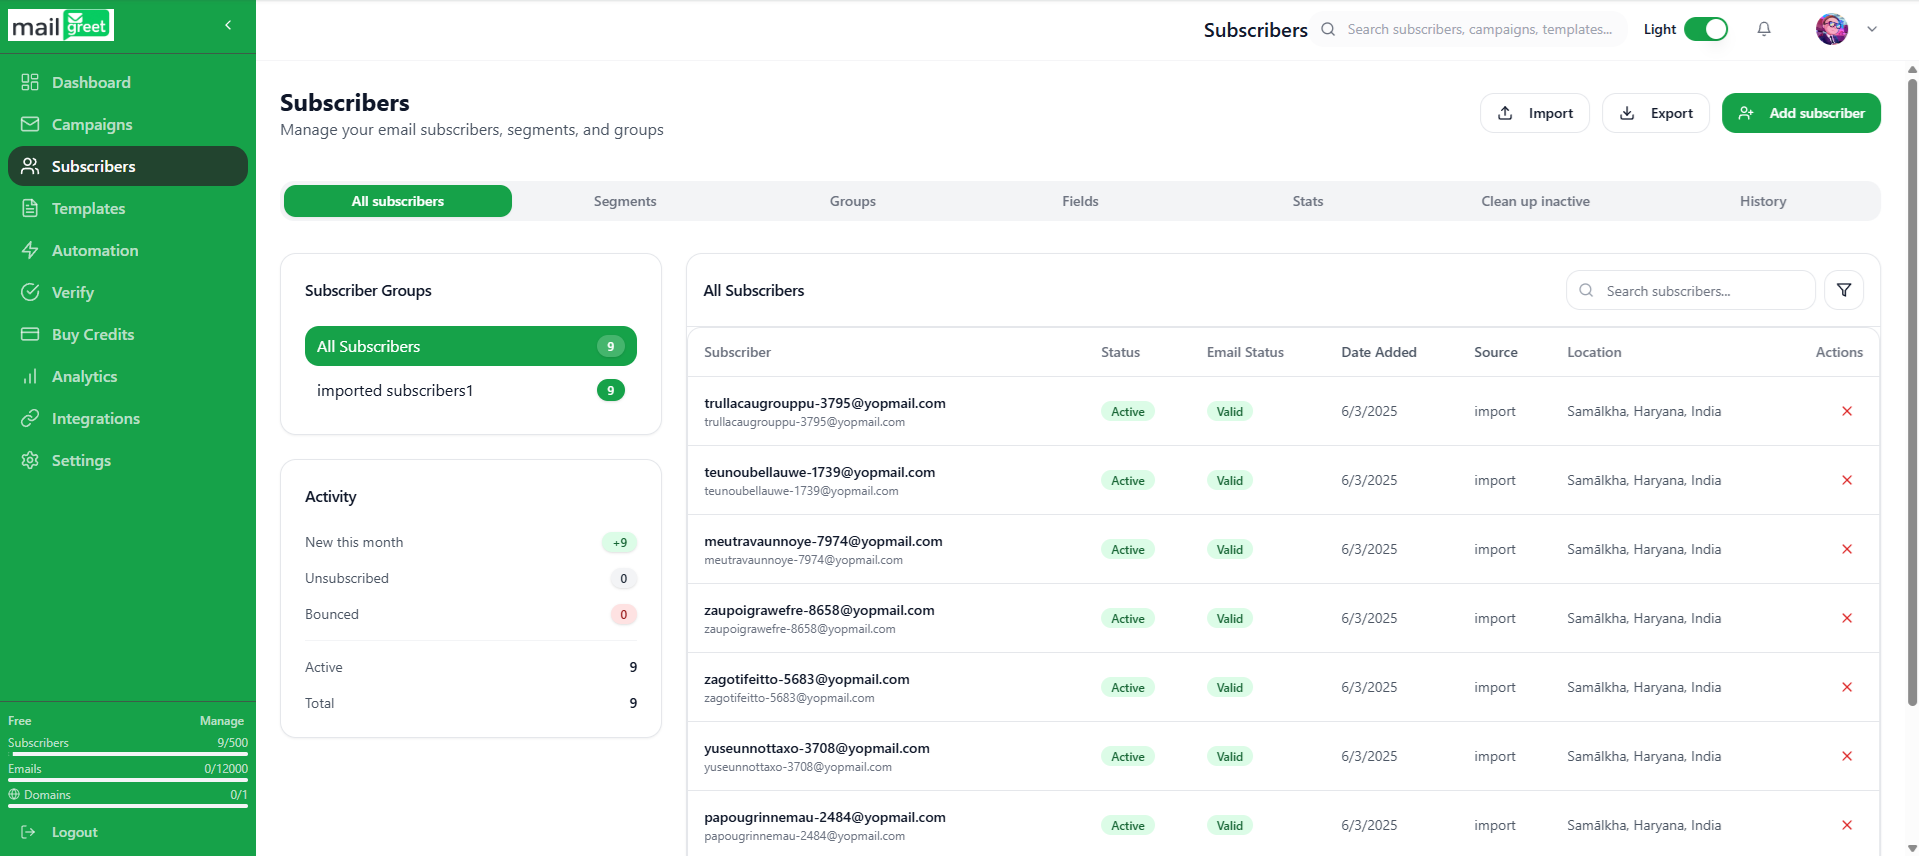
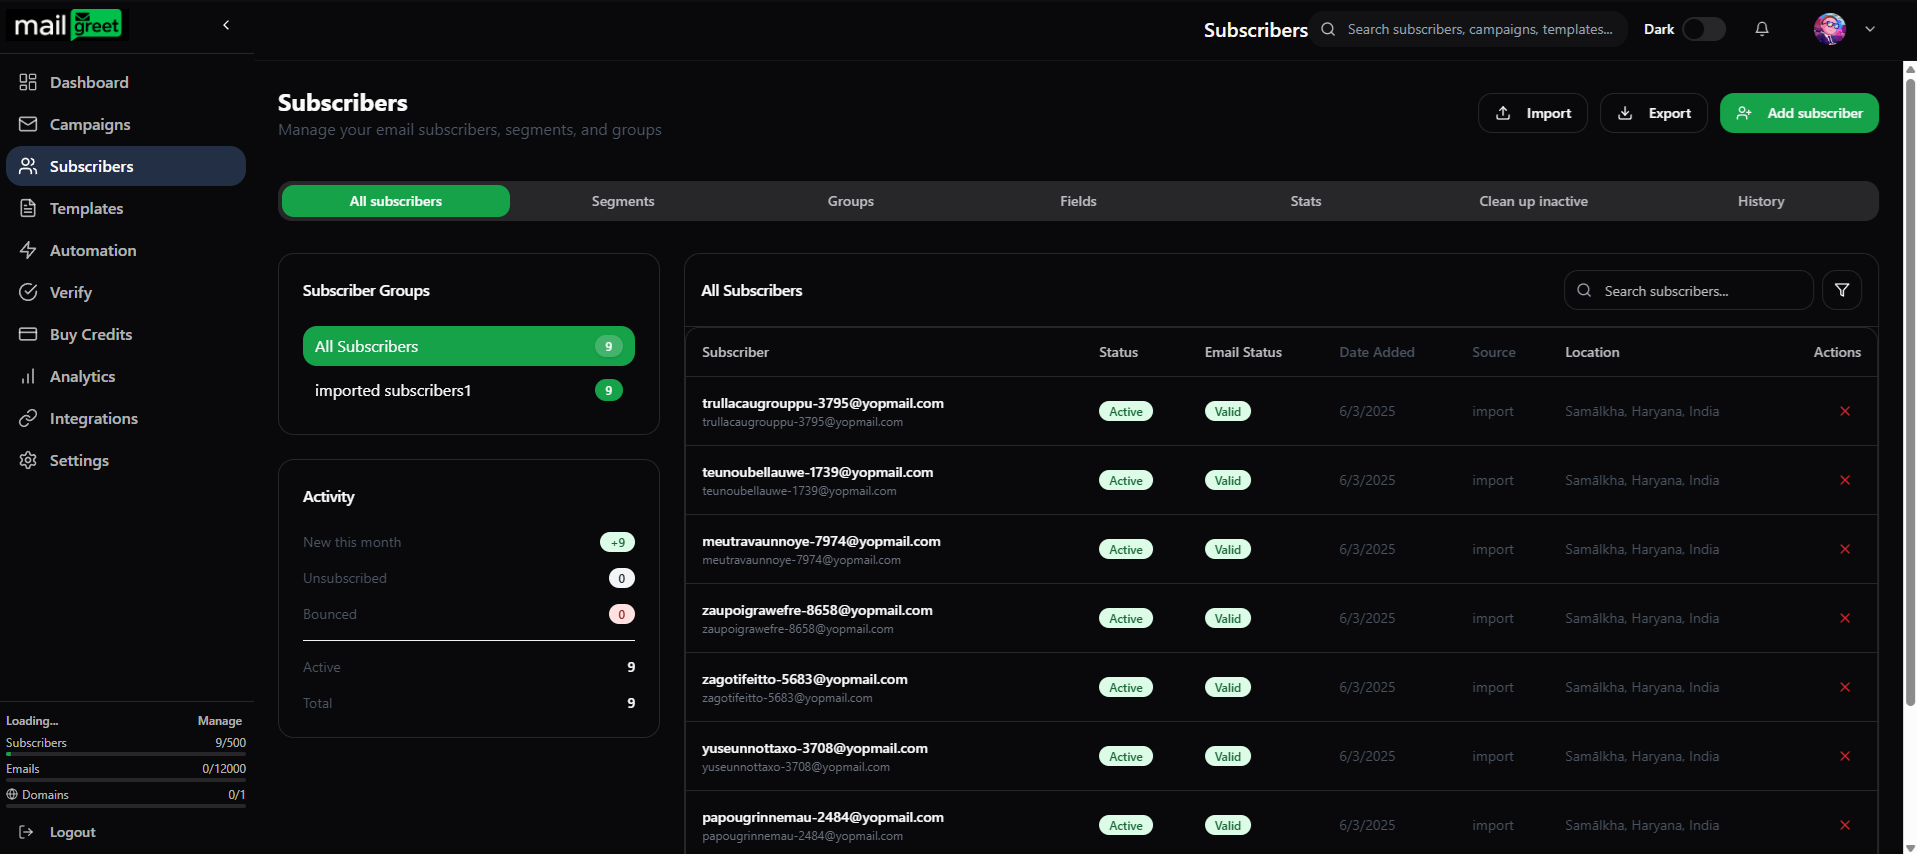 2. The main view shows all active subscribers
3. Use filters to narrow down by:
* Subscription date
* Groups
* Fields
* Activity (opened, clicked)
* Location
* Email client
### Add Individual Subscribers
To add subscribers manually:-
1. Navigate to the [Subscribers](https://mailgreet.com/dashboard/subscribers) section in the sidebar.
2. Click **Add Subscriber** button.
3. The **Add new subscriber** dialog box will appear.
2. The main view shows all active subscribers
3. Use filters to narrow down by:
* Subscription date
* Groups
* Fields
* Activity (opened, clicked)
* Location
* Email client
### Add Individual Subscribers
To add subscribers manually:-
1. Navigate to the [Subscribers](https://mailgreet.com/dashboard/subscribers) section in the sidebar.
2. Click **Add Subscriber** button.
3. The **Add new subscriber** dialog box will appear.
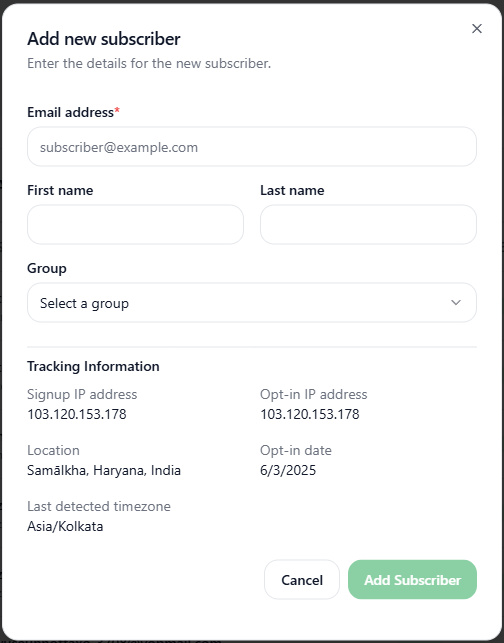
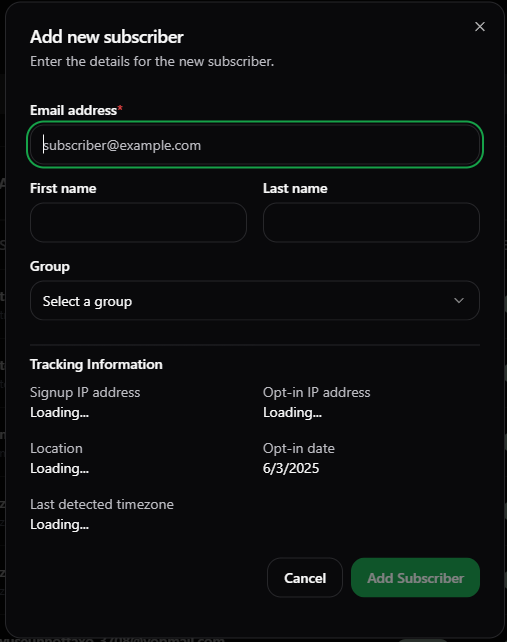 3. Enter **email address** (required), **First name**, **Last name**.
4. Select the appropriate group(s).
5. Click on the **Add Subscriber** button.
6. The email address will be automatically verified upon signup and the new subscriber will be shown as the topmost entry in the **All Subscribers** section.
7. Now, you have successfully added a new subscriber.
### Bulk Importing Subscribers
This guide will teach you how to import multiple subscribers at once.
### Required Format for Import Files
For successful imports, your file should:
* Include headers as the first row
* Have "email" as a column header for email addresses
* Use UTF-8 encoding for special characters
* Not exceed 100,000 subscribers per import
Example CSV format:
```
email,first_name,last_name,company
john@example.com,John,Smith,ABC Inc.
jane@example.com,Jane,Doe,XYZ Corp.
```
### Exporting Subscribers
This guide will teach you how to export multiple subscribers at once.
## Subscriber Groups
### Creating and Managing Groups
This guide will teach you how to create a group.
### Moving Subscribers Between Groups
This guide will teach you how to move subscriber between groups.
### Removing Subscribers from Groups
To remove subscribers from specific groups:
1. Navigate to the [Subscribers](https://mailgreet.com/dashboard/subscribers) page.
2. Click on the **All subscribers** tab.
3. Click on the particular subscriber in the **All Subscribers** section which you want to remove from the group.
4. In the **Subscriber Information** section, click on the **Edit** button.
5. A **Edit Subscriber** dialog box will appear.
6. In the **Groups** section, deselect the chosen group to remove the subscriber from this particular group.
7. Click on **Save Changes** button.
## Subscriber Segments
### Understanding Segments vs. Groups
* **Groups**: Static collections of subscribers manually assigned or based on signup form
* **Segments**: Dynamic, rule-based collections that update automatically based on criteria
### Creating Segments
Create targeted segments based on subscriber data or behavior:
This guide will teach you how to create segments.
### Example Segment Conditions
* Subscribers who opened a specific campaign
* Subscribers who clicked on a specific link
* Subscribers from a specific country
* Subscribers who joined after a certain date
* Subscribers who haven't opened any emails in 90 days
* Subscribers who have completed a purchase (custom field)
### Using Segments
Segments can be used for:
* Targeted campaign sending
* Re-engagement campaigns
* Cleaning your list
* Analyzing subscriber behavior
* Creating lookalike audiences for advertising
## Custom Fields
### Adding Custom Fields
This guide will teach you how to create/add custom fields.
### Common Custom Field Uses
* Purchase history
* Product preferences
* Subscription tier
* Member since date
* Lead score
* Registration source
* Survey responses
* Customer ID
### Using Custom Fields in Campaigns
1. In the email editor, click where you want to insert the field
2. Select **Personalization**
3. Choose your custom field from the dropdown
4. Add fallback text for subscribers without data in that field
## Troubleshooting
### Common Subscriber Issues
**High Unsubscribe Rates**
* Audit your sending frequency
* Review content relevance
* Check for permission issues
* Segment your list for better targeting
**Low Engagement**
* Clean inactive subscribers
* Improve subject lines
* Enhance content quality
* Test sending times
* Segment for relevance
**Import Errors**
* Check file format (CSV, encoding)
* Verify required headers
* Reduce file size if too large
* Fix formatting issues in data
**Bounced Emails**
* Remove invalid addresses
* Verify email addresses at signup
* Use double opt-in
* Check for typos in domains
### Getting Support
If you encounter issues managing subscribers:
* Check the MailGreet Knowledge Base
* Contact support via live chat
* Email [info@mailgreet.com](mailto:info@mailgreet.com)
* Post questions in the community forum
3. Enter **email address** (required), **First name**, **Last name**.
4. Select the appropriate group(s).
5. Click on the **Add Subscriber** button.
6. The email address will be automatically verified upon signup and the new subscriber will be shown as the topmost entry in the **All Subscribers** section.
7. Now, you have successfully added a new subscriber.
### Bulk Importing Subscribers
This guide will teach you how to import multiple subscribers at once.
### Required Format for Import Files
For successful imports, your file should:
* Include headers as the first row
* Have "email" as a column header for email addresses
* Use UTF-8 encoding for special characters
* Not exceed 100,000 subscribers per import
Example CSV format:
```
email,first_name,last_name,company
john@example.com,John,Smith,ABC Inc.
jane@example.com,Jane,Doe,XYZ Corp.
```
### Exporting Subscribers
This guide will teach you how to export multiple subscribers at once.
## Subscriber Groups
### Creating and Managing Groups
This guide will teach you how to create a group.
### Moving Subscribers Between Groups
This guide will teach you how to move subscriber between groups.
### Removing Subscribers from Groups
To remove subscribers from specific groups:
1. Navigate to the [Subscribers](https://mailgreet.com/dashboard/subscribers) page.
2. Click on the **All subscribers** tab.
3. Click on the particular subscriber in the **All Subscribers** section which you want to remove from the group.
4. In the **Subscriber Information** section, click on the **Edit** button.
5. A **Edit Subscriber** dialog box will appear.
6. In the **Groups** section, deselect the chosen group to remove the subscriber from this particular group.
7. Click on **Save Changes** button.
## Subscriber Segments
### Understanding Segments vs. Groups
* **Groups**: Static collections of subscribers manually assigned or based on signup form
* **Segments**: Dynamic, rule-based collections that update automatically based on criteria
### Creating Segments
Create targeted segments based on subscriber data or behavior:
This guide will teach you how to create segments.
### Example Segment Conditions
* Subscribers who opened a specific campaign
* Subscribers who clicked on a specific link
* Subscribers from a specific country
* Subscribers who joined after a certain date
* Subscribers who haven't opened any emails in 90 days
* Subscribers who have completed a purchase (custom field)
### Using Segments
Segments can be used for:
* Targeted campaign sending
* Re-engagement campaigns
* Cleaning your list
* Analyzing subscriber behavior
* Creating lookalike audiences for advertising
## Custom Fields
### Adding Custom Fields
This guide will teach you how to create/add custom fields.
### Common Custom Field Uses
* Purchase history
* Product preferences
* Subscription tier
* Member since date
* Lead score
* Registration source
* Survey responses
* Customer ID
### Using Custom Fields in Campaigns
1. In the email editor, click where you want to insert the field
2. Select **Personalization**
3. Choose your custom field from the dropdown
4. Add fallback text for subscribers without data in that field
## Troubleshooting
### Common Subscriber Issues
**High Unsubscribe Rates**
* Audit your sending frequency
* Review content relevance
* Check for permission issues
* Segment your list for better targeting
**Low Engagement**
* Clean inactive subscribers
* Improve subject lines
* Enhance content quality
* Test sending times
* Segment for relevance
**Import Errors**
* Check file format (CSV, encoding)
* Verify required headers
* Reduce file size if too large
* Fix formatting issues in data
**Bounced Emails**
* Remove invalid addresses
* Verify email addresses at signup
* Use double opt-in
* Check for typos in domains
### Getting Support
If you encounter issues managing subscribers:
* Check the MailGreet Knowledge Base
* Contact support via live chat
* Email [info@mailgreet.com](mailto:info@mailgreet.com)
* Post questions in the community forum